Work, Inspections & Checklists
Inspections — mechanical check on intake
Section titled “Inspections — mechanical check on intake”An inspection is a mechanical check, usually first when a car arrives. You can customize it in Admin → Inspections; a default ships out of the box.
When the tech finds something during inspection, they can turn it into a work item with one click — no re-typing.
Choose a preset that fits the car and how much time you have. There are six presets:
| Preset | Items | Use it for |
|---|---|---|
| Express | 20 | Quick lot check. Safety items only. |
| Standard | 57 | Most used-car recon. Full safety + mechanical basics. |
| Comprehensive | 105 | Deep-dive on any retail unit. All standard sections expanded. |
| Full | 133 | Comprehensive plus drivetrain, suspension, and ADAS. Use on trucks and newer tech vehicles. |
| CPO | 141 | Everything. Every item in the library. Use for certified pre-owned prep. |
| Wholesale | 12 | Auction lot only. Title, start, drive, tires, body — that’s it. |
To run an inspection:
- Open a vehicle.
- Tap the Inspections tab.
- Tap Start inspection.
- Pick a preset.
- Go through each item. Tap Pass, Fail, or Advisory.
- At the end, review flagged items. Tap Create work items to add them to the Work tab.
On mobile, use Swipe & Speak mode. Swipe left or right to pass or fail each item. Tap the mic to add a voice note. Fast when your hands are dirty.
What is a work item?
Section titled “What is a work item?”A work item is anything you’re going to do to a car. An oil change. A bumper repair. A full detail. A diagnostic. Any job.
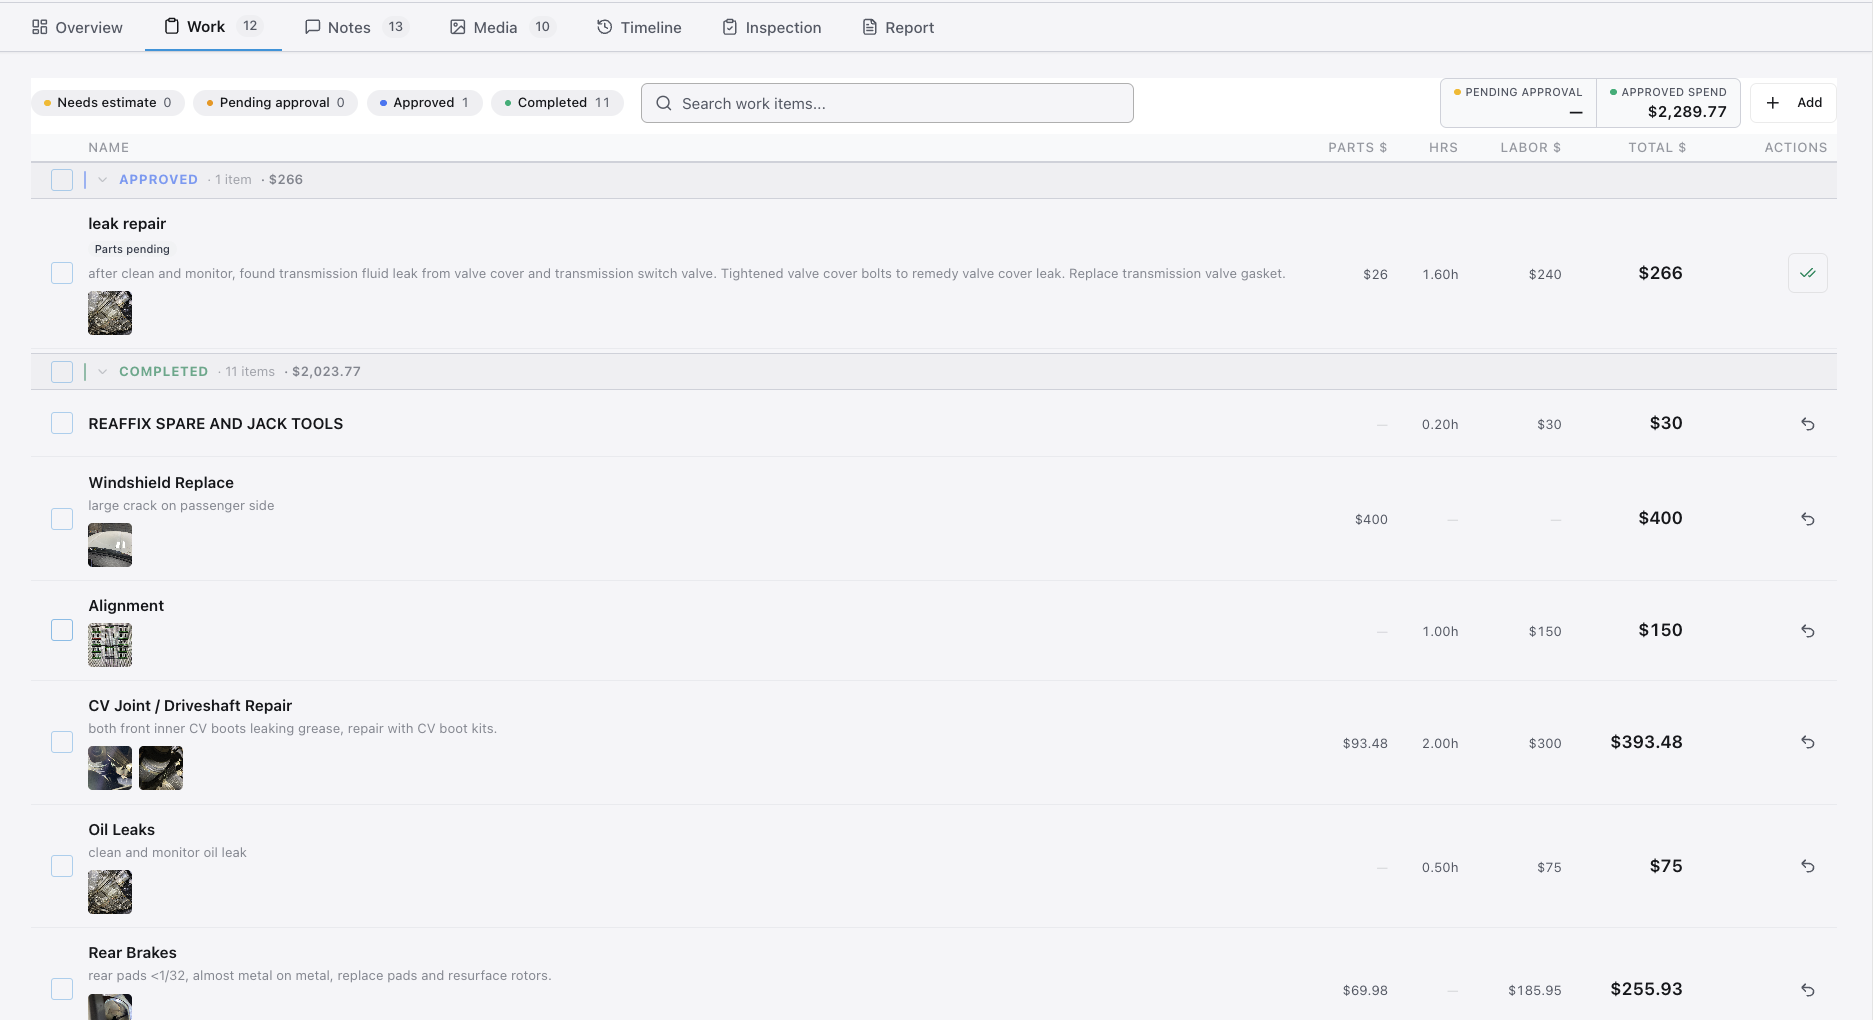
There’s no limit. Most cars have 3-10 work items between intake and frontline.
Work item states
Section titled “Work item states”When you create a work item, it lands in one of two starting states:
| State | Means | Who acts next |
|---|---|---|
| Needs Estimate | Created without pricing | Anyone — needs to be priced before approval |
| Pending Approval | Has pricing, waiting on manager | Manager approves or declines |
After manager action:
| State | Means | Who acts next |
|---|---|---|
| Pending Work | Approved, ready to do | Tech does the work, marks done |
| Done | Work complete | (final) |
| Declined | Manager declined | (final) |
A Declined item is a closed book — the work won’t happen, but it’s not blocking anything. The car can keep moving through the rest of recon. The decline is on the record so anyone looking later can see why.
Every work item on a vehicle is visible to the team in the Work tab. Managers see all items. Techs see items assigned to their area.
Adding a work item
Section titled “Adding a work item”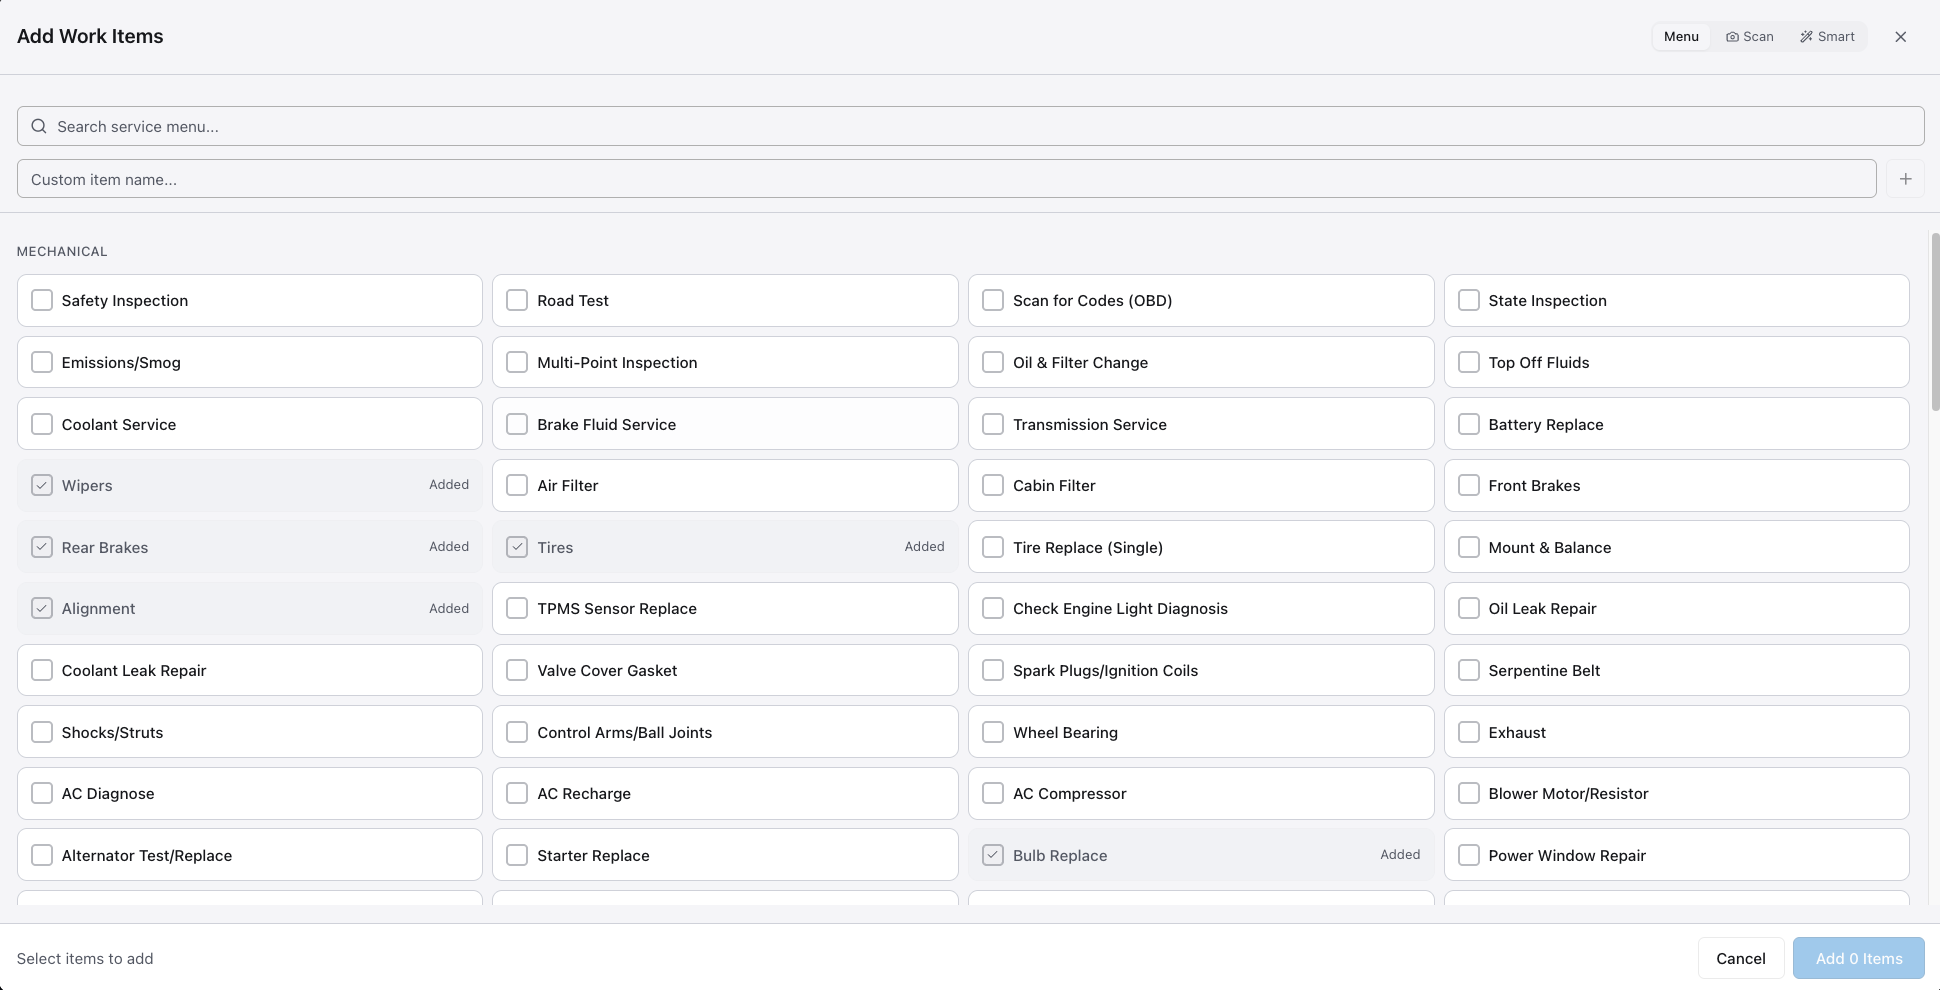
There are four ways to add a work item:
- Manual — Click “Add Work Item” on any car. Type the job, set pricing, save.
- Voice — Hold the mic icon. Speak the job. EasyRecon converts speech to a work item.
- From a photo — Take a picture of an inspection sheet, RO, parts list, or diagnostic. EasyRecon reads it and adds the work items for you.
- From an inspection — Mark an inspection item as Fail. EasyRecon offers to create a matching work item with one click.
All four methods land in the same approval queue.
Smart Input: Voice and photo input (methods 2 and 3 above) are also called Smart Input — speak the job or photograph a list and EasyRecon does the rest. Most useful when you have a paper inspection sheet or you’re walking the lot.
Pricing it
Section titled “Pricing it”Pricing lives on the work item, and the work item lives on the car. Whatever you enter rolls up to that vehicle’s recon spend — there’s no separate parts ledger to maintain.
Each work item has four pricing fields:
| Field | What to enter |
|---|---|
| Parts | Cost of parts in dollars |
| Hours | Labor hours estimated |
| Labor rate | Your dealership’s rate per hour |
| Total | Calculated automatically |
The total calculates from parts plus hours times the labor rate. You don’t type it in — it updates as you fill in the other fields.
Some service-menu items require a parts price before you can save. If the Save button stays grayed out, check the Parts field — it may need a value.
There is no dollar cap on a single work item. Enter whatever the job actually costs.
- Default pricing — If a work item shows zero pricing, set up a default in your Service Menu (Admin → Service Menu). Next time, the price auto-fills.
- Auto-added items — Some work items can be added to every car automatically (like a Standard Inspection or LLF). Configure in Admin → Service Menu → Defaults.
- Labor math — Enter hours and EasyRecon calculates labor cost from your dealership’s labor rate. Set the rate in Admin → Rooftop → Labor rate.
Manager approves or declines
Section titled “Manager approves or declines”Once a work item is priced and in Pending Approval, a manager can act on it.
Managers see all pending items on the Work tab of any vehicle. They can also pull up the approval queue to see everything across the dashboard at once.
To approve or decline:
- Open the vehicle or the approval queue.
- Tap the work item.
- Tap Approve or Decline.
- Add a note (required if declining).
- Tap Confirm.
Need to clear a batch? Use Bulk Approve — select multiple items and approve them all at once.
Declined items stay on record. Nothing is deleted. The decline reason shows in the item’s notes.
When you click into a work item (rather than approving from the queue), you’ll see four things:
- Repair Context card — AI shows typical hours, typical pricing, OEM vs aftermarket choices, common issues at that mileage. Use this to sanity-check the estimate before approving.
- Comments thread — Each work item has its own comment thread. Discuss before approving. @mention the tech to ask questions.
- Photos and videos — Attach proof. Before/after, parts photo, damage shot. Tag any photo to a work item from the Media tab.
- Parts ETA — Track expected parts delivery directly on the work item. Shows up on Calendar view too.
Tech marks it done
Section titled “Tech marks it done”Once a work item is approved and in Pending Work, the tech can mark it done.
Open the vehicle, go to the Work tab, find the approved item, and tap the checkbox. The item moves to Done.
If the checkbox isn’t there, the item is still waiting for approval. Tag your manager in a note with @mention so they see it fast. See Notes & Notifications for how @mentions work.
Customize your service menu
Section titled “Customize your service menu”Your service menu is your library of common jobs with default pricing. Instead of typing a job name, hours, and parts cost from scratch every time, a tech picks it from the list and the fields fill in.
Set it up once and save time every day.
To build your service menu:
- Go to Admin.
- Tap Service Menu.
- Tap Add template.
- Enter the job name, default parts cost, hours, and labor rate.
- Tap Save.
Add your most common jobs first — oil changes, tire rotations, alignments, detail packages. You can edit or delete any template later.
Inspection vs Checklist — they sound the same, they’re not
Section titled “Inspection vs Checklist — they sound the same, they’re not”Inspections find problems. Checklists confirm something was done right. That’s the whole difference.
| Inspection | Checklist | |
|---|---|---|
| What | Mechanical check | Anything that isn’t mechanical |
| Example | Engine, brakes, fluids, lights | QC checklist, intake checklist, photo checklist |
| Result | Creates work items from failed items | A sign-off (passed / failed) |
| When | On intake, after diagnostic | Before moving to a step, before going to frontline |
Setting up checklists
Section titled “Setting up checklists”A checklist is attached to a step in your workflow. When a tech tries to move a car out of that step, the checklist drawer opens. They check off each item. If the checklist is required, the car can’t move until every item is done.
- Open Admin from the bottom nav or sidebar, then tap Checklists.
- Tap New checklist.
- Name it. Add items line by line. Tap Save.
- Go to Admin → Steps.
- Open the step you want to attach it to.
- Under Checklist, pick the one you just made.
- Toggle Required on to block the move until it’s done.
- Tap Save.
Good uses for checklists: Detail step (interior cleaned, exterior washed, windows done), Photos step (all angles shot, no blurry frames), Frontline step (sticker in window, keys on dashboard).
Permissions summary
Section titled “Permissions summary”Who can do what with work items, inspections, and checklists.
| Action | Tech / Detail / Parts | Vendor | Manager | Rooftop Admin |
|---|---|---|---|---|
| Create a work item | Yes | Yes (their cars only) | Yes | Yes |
| See pricing | Yes (their items only) | No | Yes | Yes |
| Approve a work item | No | No | Yes | Yes |
| Mark a work item done | Yes (once approved) | Yes (their own, once approved) | Yes | Yes |
| Delete a work item | No | No | Yes | Yes |
| Run an inspection | Yes | No | Yes | Yes |
| Set up the service menu | No | No | No | Yes |
| Set up checklists | No | No | No | Yes |
For a full breakdown of roles and what each one covers across the whole app, see Admin & Help.