Welcome & Your First Day
Sign in for the first time
Section titled “Sign in for the first time”Your manager can add you in two ways:
- Add you directly. They create your account and set your initial password. You sign in with that.
- Send you an invite link. You get an email with a link. Click it, set your password, you’re in.
Either way works. If you didn’t get an email, check spam — and message your manager. They can also send a fresh invite.
Help signing in: [email protected]
What is EasyRecon?
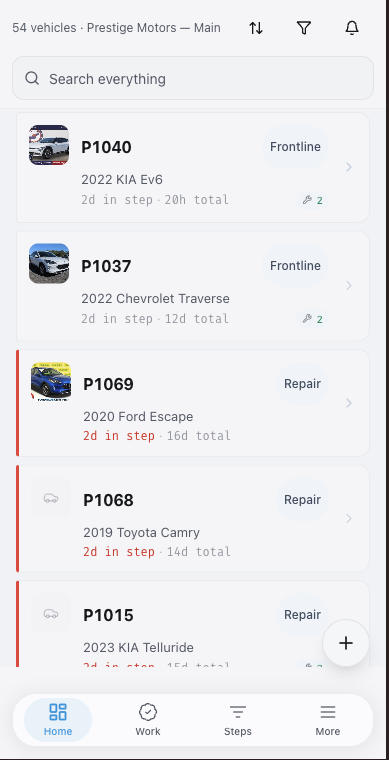
Section titled “What is EasyRecon?”EasyRecon tracks every car between the day you buy it and the day it hits the lot. That window — recon — is where time and money either get controlled or get wasted. EasyRecon puts the whole dealership on the same dashboard.
Use it on any device
Section titled “Use it on any device”EasyRecon works on phone, tablet, and desktop. Use the device in your hand.
On mobile, the main buttons sit at the bottom. On desktop, the main menu sits on the left. The work is the same either way.
Your first four things
Section titled “Your first four things”You don’t have to do everything today. But these four tasks get your dealership running fast.
- Set up your workflow steps — Tell EasyRecon how your dealership moves cars. Go to Set Up Your Workflow →
- Get cars in — Add your inventory manually or request an automated feed. Automated feed available — email [email protected] with your DMS or inventory provider and we’ll set it up. Go to Vehicles →
- Add your team — Invite your people and pick their roles. Go to Admin & Help →
- Move your first car — Tap a car. Click the step it’s currently in. Pick the next step. That’s it — the car moves and the next person is notified. Go to Vehicles →
Jump to a topic
Section titled “Jump to a topic”Want to skip the tutorial below and go straight to a topic? Pick one:
- Set Up Your Workflow — Build the step flow that matches your real dealership.
- Vehicles — Add cars, read KPIs, set deadlines, share the customer report.
- Views & Reports — Switch views, read Command Center metrics, ask AI Reports.
- Work, Inspections & Checklists — Log jobs, run inspections, set checklist gates.
- Notes & Notifications — Mention teammates, pin notes, set up SMS alerts.
- Labels, Vendors & Media — Tag cars, invite vendors, upload photos.
- Admin & Help — Manage roles, configure your rooftop, and get unstuck.
Otherwise, keep reading — the next four sections walk you through your first day.
Set up your workflow steps (1 of 4)
Section titled “Set up your workflow steps (1 of 4)”A step is a phase of your dealership’s process. Inspection, Repair, Detail, Photos — examples. EasyRecon ships with a default workflow you can use as-is or change to match how your dealership works today.
- Open the app. Tap Admin in the bottom nav or sidebar.
- Tap Steps.
- Tap Add Step to create a new one, or tap an existing step to rename it.
- Drag steps to reorder them.
- Tap Save.
For a full walkthrough — including time goals and terminal steps — see Set Up Your Workflow.
Get cars in (2 of 4)
Section titled “Get cars in (2 of 4)”There are two ways to add cars: manually or with an automated inventory feed.
Add a car manually:
- Tap the + button on the dashboard.
- Enter the VIN. EasyRecon decodes the year, make, and model.
- Confirm the details and tap Save.
Request an automated feed:
If your DMS or inventory software supports it, we can pull cars in automatically. Email [email protected] with your DMS or inventory provider name and we’ll set up an automated feed for you.
Once a feed is live, new cars appear on your dashboard on a regular schedule. No manual entry.
For more on adding and managing vehicles, see Vehicles.
Add your team (3 of 4)
Section titled “Add your team (3 of 4)”Each person on your team gets their own login. They only see what their role allows.
- Open Admin.
- Tap Team.
- Tap Invite.
- Enter their email address.
- Pick a role.
- Tap Send Invite.
They’ll get an email to set their password. They’re in as soon as they sign in.
For a full breakdown of what each role can and can’t do, see Admin & Help → Roles. To invite a specific person right now, see Inviting a team member.
Move your first car (4 of 4)
Section titled “Move your first car (4 of 4)”Moving a car from one step to the next is the core action in EasyRecon.
- Tap a car on the dashboard.
- Click the step it’s currently in.
- Pick the next step.
- Confirm.
The car jumps to its new step. Anyone subscribed to that step gets notified. If a checklist is attached to the step, it opens before the move goes through — fill it out first.
Add your first note
Section titled “Add your first note”Notes live on the car. Your whole team can read them. Use them to flag problems, share updates, or leave instructions.
- Tap a car.
- Tap Notes.
- Type your note.
- Tap Send.
Type @ to mention a teammate by name. They get a notification right away. To notify a whole group — like everyone in Service or Parts — type @service, @parts, or @detail.
For pinning notes, AI summaries, and SMS notifications, see Notes, Mentions & Notifications.
| Term | What it means |
|---|---|
| Dealer group | Your top-level account. Owns one or more rooftops. |
| Rooftop | One dealership location. |
| Vehicle | Any car, truck, or SUV moving through recon. |
| Step | One stage in your recon workflow — like a column on a whiteboard. |
| Work item | A job on a car. |
| Active Days | The days a car spent in the working portion of recon. Default window: Ready For Service through Photos. Configurable per rooftop. |
| Frontline | Terminal step. Car is retail-ready. Done. |
| Wholesale | Terminal step. Car is disposed of without retail prep. Also done. |
| Transparency Report | A public link showing one car’s recon history. Send it to the customer. |
| Readiness Light | The green, yellow, or red dot on a car card. Green = ready to show, yellow = close, red = still in recon. |